



DIY Series - Part Two: Intermediate
 Restoration Online
Published: Oct 14 2021
Welcome Back!
This is Part Two of our DIY Series where we take you through a range of our products and give you some tips and ideas to get your place spick and span.
Last time in Part One we went through the details of choosing and installing the basics like kitchen handles & doorbells.
Today we will be venturing from the realm of beginner and into slightly more difficult installations such as internal door handles, window hardware & more.
If you have ever sat down to choose door handles, you may have noticed that it can be a bit of a minefield!
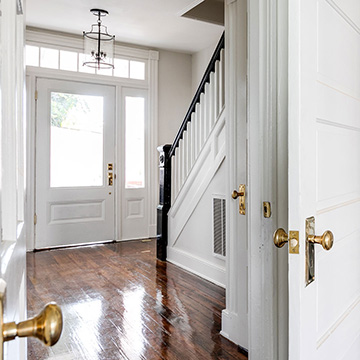
Most people will only buy door handles a couple of times in their lives and by nature, they are quite complex. And we certainly know that buying this type of complex & often higher priced items online can be daunting.
But don’t despair! We LOVE door handles!! You will struggle to find more door handle experts in one place than we have on our Restoration Online team and we have plenty of tips to share.
When it comes to style and finish selections, you may want to check our Australian Architectural Style Guide for hints and tips and always feel welcome to call or chat to discuss with our amazing team.
+ Are internal door handles a standard size?
Functional internal door handles come with a minimum of 3 main ‘parts’;
A set of handles (one for each side of the door),
A spindle, this is the square rod that connects the handles through the door,
And a latch, the part that is installed inside the door that has the tongue protruding from the edge of the door.
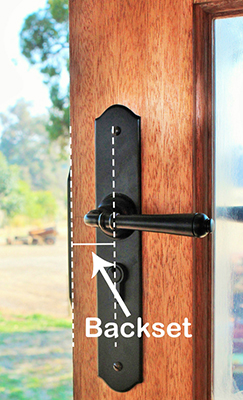
The most important measurement relates to the latch and is called a backset. This is the measurement that determines where, horizontally, the handle will sit on the face of the door.
In Australia, most doors will use a standard 57-60mm backset, however smaller 45mm and larger, 70mm backset latches are readily available.
For further information & diagrams, visit our measuring your backset page.
Another important measurement is the width of the spindle as it needs to be able to fit snugly into the back of the door handles & through the latch.
All of the door handles sold on Restoration Online are supplied with the spindle included with the handles and are displayed with appropriate size latches to accompany them. 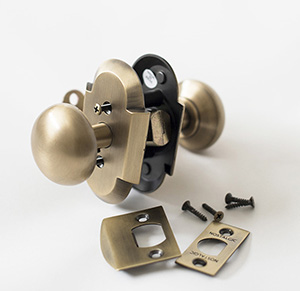
In Australia, 98% of spindles are 7.6 to 8mm wide.
If you are replacing existing door handles, the size of the handle’s backplate or the size of the hol drilled through your door may be very important
If you are planning to go out with the old and in with the new, we recommend you have a look at our replacing existing handles page to make sure the handles you purchase will work on your existing doors.
+ What are internal door handles called?
Internal door handles, these being those that are installed on all doors that do not require a keyed lock, come in three functions;
Passage,
Privacy,
And Dummy.
Passage door handles are the simplest of handle functions and used when a door is only needed to latch shut, ideal for hallways and bedrooms. 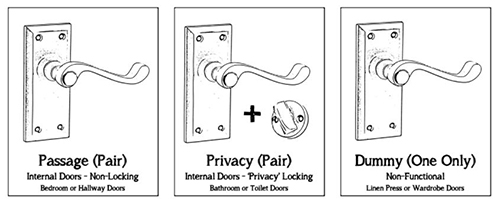
Privacy door handles are the same as passage handles as they are used to latch the door shut, however it has the extra security of a privacy lock, ideal for bathroom and toilet doors.
Privacy door handles come in many different types but all have the same function in the end that stops the door from being opened when the lock is engaged, however there is an emergency release so that the room can still be accessed in the case of an emergency.
Dummy door handles are a non-fucntional handle normally used on linen press or wardrobe doors when you want those handles to match the rest you have in your house.
If you are not sure what handle function you will need, you can check out our Step by Step Guide to Door Handles that will walk you through the process in easy to follow steps.
+ How do you install an internal door handle?
Door handle installation can vary from brand to brand, however our great mates at TradCo Hardware have created some great installation videos that really go over the basics.
For more information and installation videos, check out our YouTube channel.
Please Note: Just because these handles are classified as 'internal door handles', does not mean that these handles cannot be used on external doors. If you are using a separate lock or secuirty system on your doors, these handles are still able withstand outdoor conditions and frequency of use.
Bolts come in a large range of types for almost any application, so let’s run through the different types and what they are used for.
Barrel Bolts
Barrel Bolts are the most common type of bolt and are surface mounted. These bolts are used on all types of doors, drawers, gates & windows for added security.
There are two different types of keepers for barrel bolts, the flat keeper, when the bolt is being installed for the bolt to throw into a frame or sill at 90 degrees. The flat keeper is used over the hole drilled into the timber for the bolt throw to make the area look neat and tidy and to add strength. The standard keeper is for installation on a flush surface. 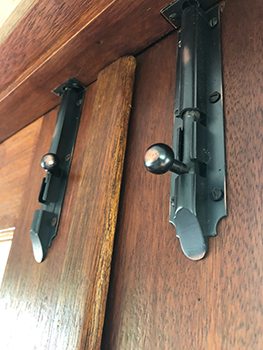
When choosing a barrel bolt, make sure you know if you require the flat or the standard keeper as bolts are only supplied with one type, although flat keepers & angle keepers (for installing close to a corner), can be purchased separately.
There are also items called an ‘offset’ or ‘necked’ barrel bolt which is generally used when installing a bolt on a door or casement window where it closes towards you and closes against a rebate- like a door jamb. This allows the throw of the bolt to be a small distance into the face of the timber frame, so that the hole drilled for the bolt is not right on the edge of the rebate.
Barrel bolts have 2 different designs, the more classic square cornered bolts, as well as the more authentic Victorian barrel bolts.
These bolts can be installed using simple face fix screws.
Tip: Our products are supplied with matching finish wood screws that are made of brass, rather than steel.
Though brass is longer lasting and does not rust,it is a slightly softer metal than steel and you will need to pre-drill using <=2mm drill bit before installing the screw with a handheld (not electric) screwdriver.
Tower Bolts
Tower Bolts are very similar to barrel bolts in function, however are slightly different in design. These are supplied with a standard keeper only and like barrel bolts are installed using face fix screws
Reverse Barrel Bolts
Reverse Barrel Bolts are a flush mounted barrel bolt. This means that when installed, it is recessed into the timber so it sits flush, rather than project outwards. This is great for items such as sliding doors when you cannot have too much protruding from the face of the door in order for the door to fit into the wall cavity. These bolts are supplied with a flat keeper only.
Tip: When recessing items into timber, use a sharp chisel and start small by making a slight indentation into the timber smaller than you need and build from there. This will help you avoid making the recess too large for the item and needing to fill and patch around the edges of the recessed item.
Flush Bolts
Flush Bolts were designed originally for exclusive use on the edge of french (double) doors.These bolts are installed on the non-active door, usually one at the top and one at the bottom, to hold this door in place firmly.
These days they are supplied in both keyed and non-keyed versions. The keyed flush bolt, unlike the non-keyed flush bolt, is designed to be installed on the face of the door or window, rather than the edge.
The non-keyed flush bolts are also available in two different sizes, the larger size is excellent for taller doors, as it brings the 'lever' that throws the bolt into the door frame further down the edge of the door, especially good for those of us who are vertically challenged!
Both of these are installed recessed into the timber.
Patio Bolts
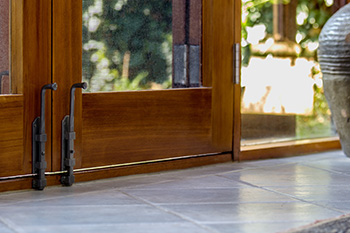
Patio Bolts are a locking surface mounted bolt. These are generally installed on the face of external doors for additional security.
These bolts are installed with face fix screws, although they are concealed once fully installed to stop any nefarious persons from removing the entire bolt to gain access.Patio bolts are supplied with both standard and flat keepers so can be installed in a number of different scenarios.
Panic Bolts
Panic Bolts are installed almost exclusively on external doors. These bolts are often installed on the inside face at the bottom of the door and bolt down into the floor, often through a cement slab. This makes the door itself almost impossible to move.
These bolts are installed using face fix screws. For these bolts you simply install the keeper (if required) and brackets onto the face of the door and then insert and secure the bolt.
In choosing your bolt finish, you will often want to match to the window or door furniture already installed.
The first step in choosing window hardware lies in identifying what types of windows you have.
Awning windows are windows that are hinged at the top and swing outwards. These are usually opened and closed using either a quadrant stay or window winder and often held shut with a hopper or spur catch.
Fanlight or transom windows are the small windows installed above a door. These windows are often fixed or painted shut over time, however a working fanlight window can be hinged at the top,bottom or even pivot in the middle and may open inwards or outwards.
There is a huge amount of fanlight hardware available for purchase, including our fanlight operators which will work with all types of fanlight windows to open, close and secure them.
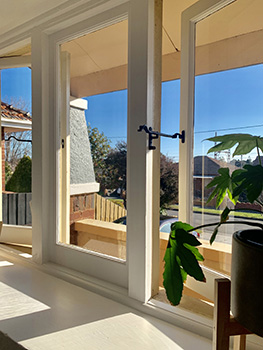
Casement windows are windows that are hinged at the side and open and close like a door, there are two main types of hardware for these windows, casement stays, to hold the window open, and casement fasteners, to hold the window closed.
Casement Stays
Casement stays are a long rod that holds the window in place when opened.
These stays come in two different types, sillmount, which is installed on the sill, or sidemount, which is installed on the side of the window.
Sidemount casement stays have the added benefit that they also act as a fastener, as well as a stay. Using face fix screws, you install the keeper onto the frame or mullion and the bracket of the arm to the window.
Please Note: Sidemount casement stays can only be used on windows that close into a frame or mullion sitting at 90 degrees from the face of the window- in the same way that a single door closes into a door jamb/frame.
Sillmount casement stays are installed on the sill and are used in conjunction with a casement fastener. The Victorian era sillmount stay includes an arm and two pin keepers. The pin keepers are installed using face fix screws to the window sill, the bracket of the arm to the bottom of the window itself.
Telescopic sillmount stays are more popular these days. They were first used in about 1915. Unlike the traditional version, when the window is open, there is nothing protruding into the room as the arm folds in on itself as it closes. Telescopic stays are installed with one end bracket attached to the window and the other end to the sill, all using face fix screws. Telescopic stays are available in keyed and non-keyed versions.
Tip: Place the stay in the complete closed position on the window sill before marking the location to pre-drill the screw holes.
For the ability to open the window further, install the bracket that is attached to the window closer to the hinged side of the window.
Casement Fasteners
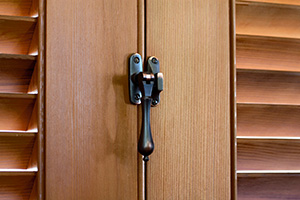
If you’re using a sillmount casement stay, you will also require a casement fastener to hold the window shut.
The fastener itself is a small handle with a throw attached. You attach the handle to the window with face fix screws.
You then install the keeper.
There are two keepers supplied with our casement fasteners, a flat keeper, which is used when the frame or mullion meets the window at 90 degrees and a flat keeper which is used when the window meets flush to another surface, this is often the case for double casement windows. The keeper is rebated flush with the surface of the timber frame and is also installed using face fix wood screws.
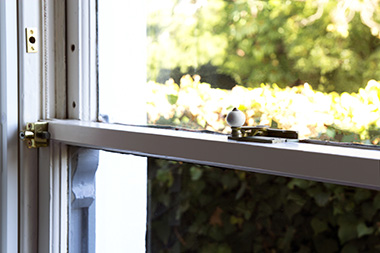
Sash windows, also known as double hung windows, are usually two ‘sashes’ installed on top of each other that slide up and down. For these windows you require a fitch or sash fastener to hold the windows closed, as well as sash lifts which are ‘handles’ to help lift the bottom window up and open.
Sash Fasteners
Sash fasteners, sometimes called 'fitch' fasteners, are a small catch installed to hold and ‘lock’ the window in a closed position.
There are two parts to a sash fastener, the keeper and the fastener. The keeper is installed on the top meeting rail (which is the horizontal piece of timber at the very bottom of the top sash) using face fix screws.
Tip: When choosing a sash fastener, you will want to check the width of your top meeting rail to ensure that the keeper is small enough to fit on this ledge. The keeper size is listed in our product information table.
The fastener itself is installed on the bottom meeting rail (which is the horizontal piece of timber at the very top of the bottom sash). This is installed with face fix screws.
Tip: Aligning the keeper and fastener is very important. Make sure to sit the items uninstalled on the meeting rails and mark the position of the screws carefully before pre-drilling.
Sash Lifts
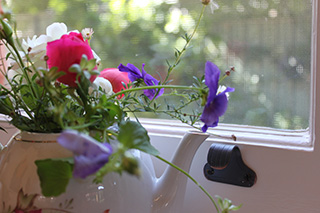
Sash lifts are the simple hook shaped ‘handles’ that are installed using simple face fix screws on the bottom rail (the horizontal piece of timber at the bottom of the bottom sash) and used to pull the window up and open. 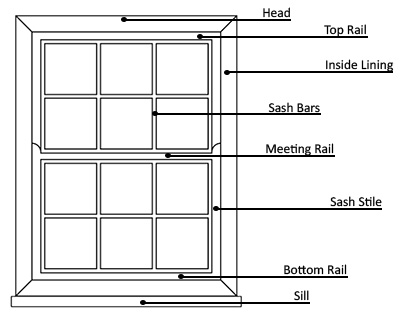
Normally, two sash lifts are used per window, however on some very narrow sash windows, only one lift is used.
Tip: Use a tape measure to measure up from the window sill to the bottom of the sash lift to ensure both lifts are installed at the same distance.
There are also other sash window fittings such as sash drops, used to hold the window open, and sash pulleys, which are an internal working of the window, usually only purchased as replacements or by window manufacturers when making new windows.
Window hardware finishes are often matched to door handles or other metal fixtures in the house.
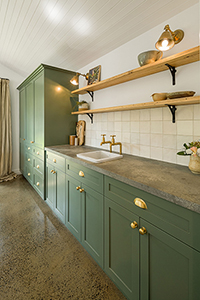
A great way to add some character to a wall in your house is to add some shelves. Not only are they great storage, but with a gorgeous bit of timber and some classic shelf brackets, you can make them into a feature that all of your neighbours will want to copy! 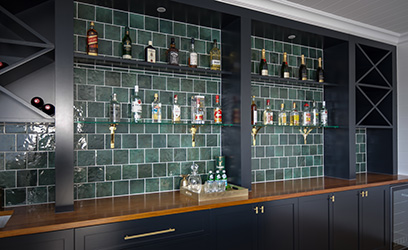
Choosing shelf brackets is easy. All of our brackets are made of brass or iron so are extremely durable and you choose the size based on the projection of the shelf you wish to install.
When it comes to installing the brackets, you will install using face fix screws. When installing onto a wall, it is very important to remember to screw into a secure place.
If you are installing onto platerboard, you will need to find the wall studs and make sure they are screwed directly into the stud to ensure the bracket doesn’t pull off the wall.
Tip: Mark the location of the screw holes on the wall as well as the position of the top of the bracket. Use a spirit level to ensure that the spots marked for the top of your brackets will be level before drilling any holes in the wall.
Our shelf brackets are also great to use as decorative pieces around a verandah, very common on houses built in the early 1900s.
If there is anything unusual about your installation, please don’t hesitate to contact our team via phone, email or live chat with any questions you may have.
VIEW ALL
THE DIY GUIDES